Saturday, December 5, 2015

makeshift mantel...

This year my decorations have slowly been going up between baby naps, feedings. pumpings and changings. After putting the lights on the tree I mentioned to Brett it looked spectacular without ornaments; that was all in hopes that he would agree and I could skip a step. Bless his lumber loving heart of course he prefers trees with just lights. 

This will be Christmas number two in our house, and our first with baby Paige. Each year I try to add one piece to our decor collection. Usually this involves a DIY or purchase from the previous year's holiday clearance. Last year involved some burlap and burgundy ribbon to adorn the garland on our white picket fence. The bows will be resurrected again with garland this year!

Since our home does not have a fire place, the opportunity for setting decor anywhere else in the living room is minimal. Cue the Christmas gift I received from Brett last year - my player piano! It has moved into the living room since last December so the top surface will serve the need for our mantel this year. 

Using cranberry garland that normally has adorned my four poster bed when I was in the loft, I assembled it on the top of the piano with my line cone candle holders. All my current frames were gathered and arranged them between the cones. Unfortunately, that also reminded me how badly I need to print some wedding and new family photos...

Rule of decorating that I have mentioned many times, the more congruent and neutral your decor is the easier it is to reutilize pieces in a new way. Woodsy neutral with a little sparkle would be how I would describe my theme. Anything that fits into that is fair game for adding to the collection. So since the mantel was not a new addition, I decided to add an easy DIY that anyone can do! 

The tale of the green couch also yielded an fantastic frame that has served many purposes in our home. It was green and semi gilded when purchased for $5, and was repainted gold and an MDF board coated in chalk paint replaced the painting. First it was used as a directional sign for our wedding, then donned our wall, followed by use as a directional sign this summer for our friends wedding and then to the current state where it was an empty frame back on our wall. 

Using some sparkly ribbon that has seen many purposes over the last 5 Christmases, I purchased a clearance boxwood wreath that also has the berries in it to match the garland. Taking the ribbon and looping it through the wreath and tying a simple bow (thanks to all my cheer years) it was the easiest Christmas DIY I have ever done. Centering it above Green Mossy, and presto - the Christmas cheer was spread to two new places in the living room. 


Wednesday, November 18, 2015

our miracle baby is here...

As we put the nursery together, I couldn't help but be in disbelief that this room is for our daughter. The peach frost paint echoes the sweetness that I hope she has in her heart. Pieces of both Brett and I have begun to enter this space; the thought of meeting someone who is part lumberjack and part me makes my heart turn into mushiness.

If you would have known me 5 years ago - you would be scratching your head wondering what happened to me. Kids were not in my plan, I am scared to hold babies, and being a mom was the last thing on my list that I ever thought I would check off. Now, here I am melting like butter over the tiny diapers we have stocked in the nursery.

There is one word that I would use to describe the place I have found myself in...blessed. As a dear friend of mine put it so well, it is 'realizing the deepest desire of your heart that you didn't even know you had.' Only one person could bring me to this place, and I took my time getting here. It took heartbreak, loss, brokenness, judgement, anger, redemption and healing to bring me to a point of feeling this way, but I wouldn't go back and change anything...Christ has brought me here.

When I say I am still in disbelief that Brett and I are adding to our family, truly sometimes it took me seeing my bulging belly to remember that this is real. Being pregnant was the last thing I trusted by body to be capable of. This is something I have known for about 10 years; I accepted it at the time and moved on with my life thinking 'mom' was never a job title I would hold. Brett even knew it and was a friend when I struggled through the news when I first found out my freshman year of college.

Having a family was never something I truly had a desire for until I started dating Brett. He knew well about the fact that it would be difficult to have a family on our own; I was very open about that since I knew having a family was important to him. To my satisfaction, he was open to adoption as a plan for growing our family. When the time was right - we would be ready to open our hearts to someone in need of a home.

Being the perpetual planner that I am, that 'right time' was when we had been married for 5 years and had stashed away a heavy sum in an adoption savings fund. So you can imagine my shock and disbelief when I found out I was pregnant only 6 months after we were married...may I also mention the week before I started a new job. That was not my plan. Panic overcame me and it was hard to be excited when something so bizarre to me had just popped into our lives. Silly me, I couldn't even see the miracle that I had encountered.

Brett struggled along side me as I went through emotions of having my plan disrupted, feeling like we didn't get enough time together, and my sheer terror of being ready to be a parent. I was still in denial when I called the doctors office back in March and said - I think I am pregnant. The most darling nurse on the other end of the line asked if I took a pregnancy test and if it was positive, to which I answered 'yes'. Hiding a chuckle in her voice, she said well you are most definitely pregnant and let's schedule all your initial appointments, ultra sounds and find out your due date. {Due date? Don't you need a blood sample, urine sample and my right arm to confirm this?!} Turns out there is rarely such a thing as a false positive.

My denial continued until our first ultra sound, despite my chest that looked like I had a breast augmentation over night and the severe vomiting all hours of the day. When we went in I told Brett I was so nervous there was going to be an empty screen. What if nothing was in there, what if my body wasn't a suitable home for the baby, what if something was wrong?

Low and behold, there she was bouncing around in her little swimming pool as cute as ever. Seeing her little heart beat changed my life forever. Reality set in as I looked at my husband and soon-to-be father that God had allowed us to become parents.

As you may have read previously, pregnancy was not glamorous for me. {Brett's words.} The only test I didn't fail was the Group B Strep Test, and later when they tested me for preeclampsia after having gestational hypertension pop up. Everyday for about 30 weeks I was slave to the porcelain throne and thought seriously about installing a garden knee pad next to it. At 35 weeks I was put on bed rest after asking if I could still go to prenatal yoga that night. Seems like I like really clear and outlined parameters. 

After testing negative for preeclampsia {thank goodness}, my doctor scheduled an induction for 38 weeks. My body apparently couldn't handle any more. In my mind, Jesus had given me somewhat of a plan! November 4 we checked into Holland Hospital after carbo loading at Hops at 84 East. Prepared to endure what I anticipated to be 24+ hours of induction, I settled in and hoped for some good rest after a sleeping pill and sending Brett home to sleep in our own bed.

Without too much of the TMI details, my water broke at 4:15 am and things progressed quickly after that. Brett was called in and got there by 5:30 am and my epidural soon followed. Things came full circle when I got nauseous and threw up right before I started to push. {Seriously?!} The next part I am told is pretty uncommon, especially for a first baby. After pushing 3 times and then throwing up, I literally puked our miracle baby out. The entire ordeal took maybe 5 minutes. {Don't hate on me, the 9 months prior was sheer torture.}

Our daughter Elizabeth Paige Kuipers entered the world at 9:51 am {yes I waited an hour for my doctor to come out of a c-section - even took a nap} at 8 lbs 6 oz and measuring 20.5 inches long. My fear that she would be tiny since she was two weeks early and since I was so sick vanished when the doctor held her up. My eyes may have nearly fallen into the puke bucket my loving husband was clenching. {Bless his heart.} She was here and she was so perfect; we just love our Baby Paige.

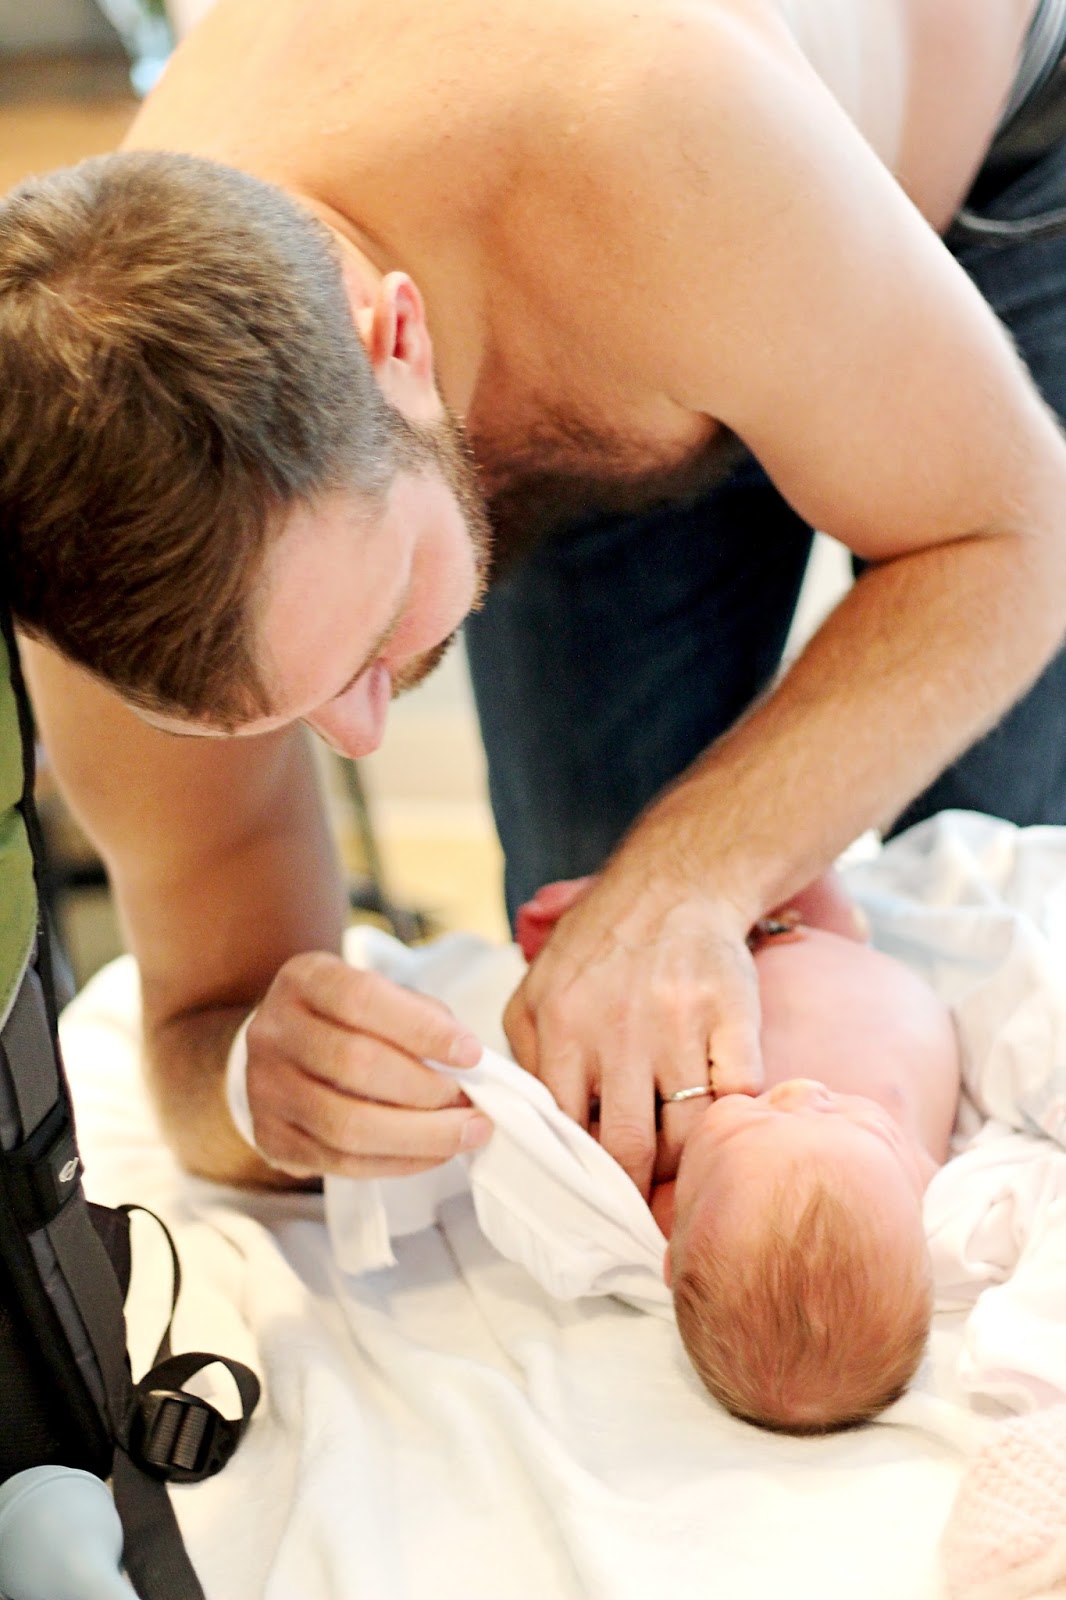
These first two weeks have been so wonderful regardless of the struggles of adjusting to caring for a newborn. Watching Brett be a dad is my absolute favorite part. We are two lucky ladies to have such an awesome man in our life. Enjoy a few photos below from the hospital and our first few days as a family of three.

If you want baby overload, head over to my Instagram and follow me at @darkaykuips.


Tuesday, October 6, 2015

how can i make that...

For some reason, my brain works in taking things apart and trying to reassemble them. Anytime I find myself looking at some housework or decor item that I like in a magazine or store, instead of about purchasing the item my brain is asking, how can I make that? Exhibit A, B and C with all the furniture projects I have currently. 

Most recently I have been loving the table settings for Thanksgiving and the Holiday Preview for Pottery Barn. One of the best days of the year is when the Holiday Catalogue comes out from that store.

Currently, our refurbished table has a table runner and one complete chair. The other 5 are waiting to be painted and waxed until I can maintain a squatting position without popping out a baby.

What I have found recently is that Brett enjoys using the table runner for a placemat. Of course after living as a bachelor, why would he feel the need to put anything under his plate...so I'll give him credit for adding something. Needless to say the runner got splattered and I end up washing it all the time.

While I was spending a rainy day not hunting our to my current condition, I spent my time walking around stores hoping to move a baby along to delivery. {To my dismay that did not happen.} One of my favorite new stores is Home Goods in Holland. Seriously, so much inspiration there! That is where we landed Bert the Moose that was installed in the nursery, along with the super fluffy fur rug.

Since I was not there for a particular item, I like to roam the aisles and look for clearance finds or inspiration. When I got to the placemat and table covering aisle, I broke down and decided it was probably time to purchase some in order to protect the table top and the runner from Brett's ceaseless red sauce splatters. Most came in 4 packs of $14.99 in different designs. Nothing seemed to be the right look - who knew I would be picky about placemats. I would need at least two packs since we have 8 seats; $30 for 8 placemats I did not really care for did not sound like a great deal to me.

Lately I saw some mats in Anthropologie's fall catalogue that I really had my heart set on, but the price at $28 a piece was not urging me to buy them. I loved the hand woven look with the fringes on the edges. The fact that no two are alike makes them eclectic and handmade. Also, the red wasn't really fitting with my decor scheme.

Low and behold when I turned around to depart the placemat aisle feeling defeated, I spotted some hand towels that had that same hand woven look with fringes on the edges. How can I make that into a placemat? is immediately where my mind went. There were two great neutral designs with two kitchen hand towels in each pack for between $2-$3 each. This was going to be a cinch, and way better than some plastic woven thing I didn't like.


This project is so easy! It might be something you could pick up kitchen towels from after holidays when they are clearance items to add to your holiday table.

To start, one of my favorite things to do - iron! You will need to fold each towel in hand and iron out the creases and create a straight center fold to cut the towels in half.


Once the towel is cut, you can then create the seam with one of my all time favorite quick craft fixes - no-sew seam glue. I pick up a packet overtime I go to Ikea for about $1. Saves time from having to break out the sewing machine. First, fold over the edge and iron the seam to match the size of the seams on the outside edges. Then add the no-sew tape under the folded edge and iron over to melt the tape.


Wah-lah! You have yourself an artisan hand made placemat. Total cost of this project for me was $5.45 for the towels and it yielded 8 mats. Not to mention, I love how they have a little sparkle woven in...it will be perfect for Christmas!


Sunday, September 27, 2015

does your moose hang low...

Things are finally on the wall! That took far longer than I had hoped, but the third trimester tiredness is catching up along with a lot of pain from something called SDP. Stinking relaxin...

The kit I picked up from Menard's had all the essentials for hanging any type of frame. Only the oblong squarish frame needed some hanging wire. Everything else was ready to go!


So, things have been laid out on the floor to give us an idea. That is the best place to start so you don't get frustrated when it doesn't look right on the wall. Here is where I started...


Things got rearranged a few times, and then it was time to transfer things to the peach frost canvas above the crib. A great tip I read on Pinterest is to make cut outs of your frames to arrange them on the wall before putting any holes in it. Lucky for me, I have this roll of never ending silver striped wrapping paper that was perfect for the job. Each frame was traced and cut out of the wrapping paper and I used painters tape to affix them to the wall. Starting with where I knew the largest and center frame would go, I placed each template around it...several times. 


After much deliberation, I was ready to add the moose. Most people get frustrated with all the measuring involved with hanging items on the wall. If you use painters tape to mark holes and then transfer them to the wall, it is easy to make your fasteners exact without having to pull your hair out over the tape measure. Bert the Moose was perfectly placed! 


Brett and I are still carefully considering a verse for our baby girl, which will go in the frame on the lower right. There is a little space on the upper left to do something, but not a frame. I'll have to keep looking until I find the right small object to place there. The wreath on the left has a monogram in it, but something has to stay a surprise until she's born! 


Saturday, September 26, 2015

when you're the pregnant lady at menard's...

For this lovely last weekend of September, Brett has departed on a fishing trip with his pops to the Upper Peninsula. Something I am normally fine with, but after measuring ahead at my last doctor's appointment by about 2 weeks there was a slight panic. As soon as I was alone in the house, this incredible urge to clean and project everything absolutely took over me.

Working on hanging the gallery wall, cleaning, and doing laundry became my fun this weekend. Also, the hospital bag was packed in quick order in case Miss Baby K decides to make an early appearance. Brett seemed annoyed that I wanted to make sure I had everything we needed when the time came. My checklist wasn't me trying to be overbearing, it was me trying to latch onto the only thing about labor and delivery I could control at this point.

Realizing I needed some hanging nails, wire, lightbulbs {after obsessively cleaning 2 chandeliers}, and some snacks for Brett's hospital bag, I decided a trip to Menard's would be fun. With my trusty list in hand, since I can't seem to remember anything if I don't write it down anymore, I made my way to DIY Funland. The list also ensures I stay on track...I don't have time to add anymore DIY projects to my growing list.

Lightbulbs...first on the list, buy what is this?! Lighting sale? Well I will just take a look around...

Two aisles later, I find myself gawking over how cute a 1930's style 4-bulb chandelier would look over our dining table. Not to mention is't on sale for $44.99, originally $111. Long story short, the original home owner wanted the beautiful chandelier that was over the table when she sold to us. While she did replace the light, it was modern looking and I truly despised it. However, I let it sit there being functional {even though it made my eye twitch} until we found a solution. Into the cart the giant box went; not without about 4 employees walking past to ask if I needed help lifting the box. Seriously, it weighed maybe 7 pounds, do I really look like I am having that rough of a time?

Without further distraction, I decided to stick to my list only. Snacks were next. Menard's has some surprisingly good deals on food if you have never been to their grocery section. So, here I am stocking up - the really pregnant lady with all the snacks and a light fixture. Anytime an associate would pass my aisle, they felt it necessary to ask if I needed help with anything. While I would normally appreciate this gesture, it for some reason made me feel like a targeted helpless individual.

Fasteners in the cart, I headed out to door only to turn back around to the store since I forgot my wallet in the cart. Luckily, I called right away and they said an associate had turned it in within minutes. Wallet retrieved, I was ready to start with my light fixture project. Really, I think I am only delaying hanging the gallery wall because I am scared to put holes in my fresh paint. 

Once I took down the old light, I wound up with two wires - not knowing which was black or white. Since our house was built in 1930, the electrical wires for the ceiling lights are still original. Joy, the old light had clear wires so I had no clue which was which.


After consulting ThisOldHouse.com for articles on this very issue, testing the voltage and consulting my electrician brother-in-law, I confirmed that you could hook the wires up to either black or white wire on the fixture. If the house burns down while Brett is gone, at least I'll have a good story for him. 

Women, do not be afraid of electrical. It is truly not difficult as long as you are being safe. First, turn off the breaker for the outlet/fixture you are working on {don't worry, I did that before I started taking the old light down}. I have also found that having an old house and sometimes unclear hanging directions from the manufacturer can also lead to making things difficult. Pay attention to how the old light is coming down, that will most likely indicate how the new one will go up. Once my base was secured in the studs {note we do not have an outlet box since the house is old}, I adjusted how long I wanted the light to hang and used my handy wire cutters to trim the excess black and white wires. 


After your wires are trimmed, you need to strip the wire from it's coating to expose the actual wire underneath. That is where my wire cutter comes in super handy since it has the holes on the front end to strip wires. Remove the extra piece to expose the end of the wire entirely. Your wires can now be attached to the wires in the ceiling. I always attach my ground wire first, and make sure that both live wires are separated from each other. 


This is when having an extra set of hands can be helpful, but I was feeling ambitious. Attaching the light to the base that was installed was tricky, but I did it! Also, I turned the breaker on to test the switch in case something didn't work before I completed the project. Let there be light - it worked and no sparks! 


I really like the classic look of the brushed nickel and style of the metal. If I get sick of the glass orbs, remind me to just pop some Edison bulbs in there to change up the look. One step that is easy to miss is to wipes down the orbs with glass cleaner on the outside and inside before installing. Sometimes flecks of cardboard from the box can get inside - that will cause a dark spot of look like a bug crawled in your light. 


So, sorry Brett for getting carried away while you were gone...but for $44.99 my eye twitch has stopped. Now, would anyone like a modern looking chandelier for their home?